Starting an online store is an exciting way to turn your ideas into a business and reach customers worldwide. When I started exploring ecommerce, I quickly realized how much easier it is with a clear plan.
In this guide, I’ll walk you through seven steps to start your online store:
Along the way, I’ll also share practical tips based on real-world experiences from ecommerce experts. By the end of this guide, you’ll have everything you need to build your own online store confidently.
1. Decide what to sell online
First, you must know what to sell, how profitable it is, and whether there’s a demand for it. Start by going through the list of what you want to sell and checking what’s trending.
For me, using Google Trends was a game-changer. It’s free and super easy to use. Just go to the Explore page, add your product keyword, and compare it with a few others.
As an example, I compared three fitness equipment products to see which had a higher search interest.
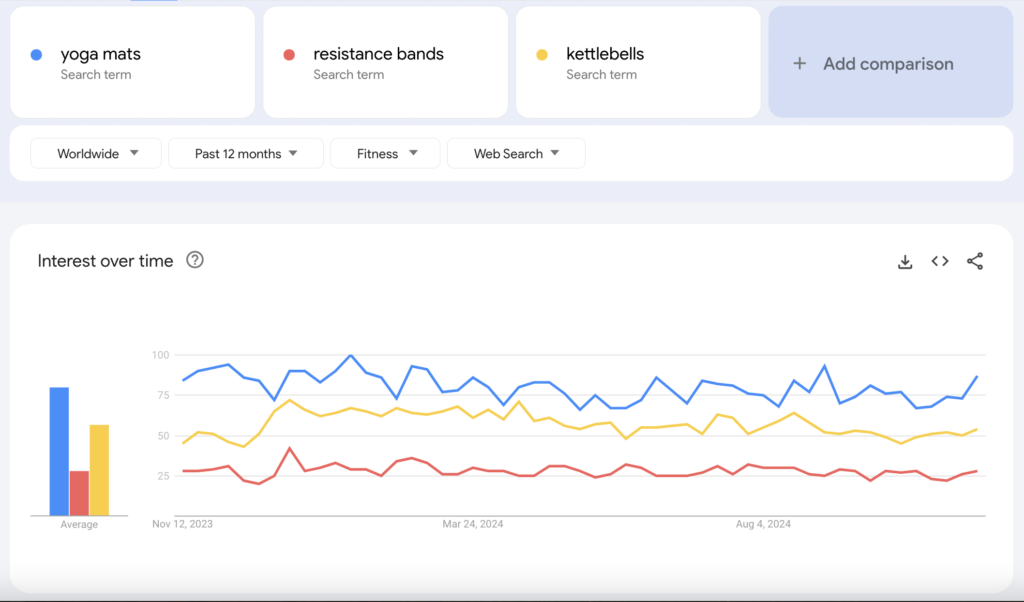
The results show yoga mats have had the highest interest over the past 12 months, making them the ideal product to sell online.
Once you’ve picked your product, think about how to source it. I’ve seen three common methods work well:
- Making your own products. This is great for selling unique items and having full control over quality.
- Reselling products. Buying from suppliers and selling at a markup gives you variety and flexibility.
- Dropshipping. This low-risk option doesn’t require you to hold inventory because your supplier ships directly to your customers.
With your products and sourcing set, it’s time to price them effectively. Make sure to evaluate your costs and determine your desired profit. For a complete guide on setting the right price, check out our tips on pricing a product.
2. Figure out your target audience
Knowing who will buy your product helps make everything easier, from deciding where to advertise and what to say, to designing your store. Instead of trying to appeal to everyone, focus on the people who will be most interested in your product.
Start by creating a buyer persona. This is a simple profile of your ideal customer that answers questions like:
- How old are they?
- Where do they live?
- What are they interested in?
- What problems does your product solve for them?
For example, if you’re selling reusable water bottles, your target audience might be people who care about fitness and sustainability. They’re likely in their 20s or 30s, live in urban areas, and follow eco-friendly trends on social media. Here are the ways to find them:
- Search social media hashtags related to your product, like #ecoliving or #hydrationgoals, to see who’s posting and engaging.
- Join online communities like Reddit or Facebook groups that match your niche and observe what people discuss.
- Look at competitors’ followers on platforms like Instagram to see who’s already interested in similar products.
Once you’ve defined your buyer persona and figured out where to find them, let that guide all your decisions. Knowing your audience makes it easier to connect with them and grow your business.
3. Build your brand
Building a brand from scratch is an exciting process, and here are the essential elements you need to launch your online store. They include defining your brand values, choosing a business name, and creating a visual identity.
Define your brand values
Your brand values are the foundation of everything, including your name, visuals, and messaging. I’d ask myself:
- What does my business stand for?
- What do I want customers to feel when they interact with my brand?
- How do my products reflect those values?
Choose a business name
Your business name is other people’s first impression and sets the tone for your brand. Think about your product benefits and who your audience is.
For example, if you sell candles with eco-friendly ingredients, business name ideas like Pure Earth Candle Co. or Forest & Wick might work.
Once you have a name in mind, check if the domain is available (for example, yourbusinessname.com). A matching domain makes it easier for your audience to find you online and reinforces your brand’s professionalism.
Personally, I use our domain name search tool to find out if the name I want is available. It’s a simple tool that shows which domain names are taken and suggests alternatives.
Domain Name Checker
Instantly check domain name availability.
Create your brand identity
With your name and values in mind, bring your brand to life visually. Consider colors, fonts, and a logo that reflects your values.
- Logo. Keep it simple yet memorable. Tools like Canva are great because they’re easy to use and have pre-made templates.
- Color palette. Choose 2-3 colors that represent your brand’s personality, such as greens for eco-friendly or bold reds for energy.
- Fonts. Pick one or two fonts that are professional and easy to read on all devices.
4. Choose a business structure and register your business
Getting your business structure and registration sorted early is important. It gives your store a solid legal and tax foundation and prevents headaches later. Don’t worry, it’s simpler than it sounds, and I’ll guide you through the basics.
First, decide on a business structure. The most popular options for beginners are sole proprietorship or limited liability company (LLC). The former is the simplest and perfect for small-scale ventures, while the latter is perfect for larger businesses.
For long-term success, I recommend going with LLC from the beginning. It’s more secure and scalable, so you won’t have to worry about switching structures later.
Plus, an LLC protects your personal assets. If there are any legal issues or debt, the LLC’s creditors can only go after the company’s assets, not your personal cars, homes, or bank accounts.
The next step is registering your business. Here’s a simple checklist to guide you if you’re based in the U.S.:
- Confirm the business name. Make sure it’s available for registration and as a domain name. A matching domain boosts your brand’s professionalism and makes your store easier to find online.
- Register a business address. Use your home address or a dedicated business address, as some platforms may require it for verification.
- Submit business documents. For an LLC, file documents like the Articles of Organization with your state’s business office. Sole proprietorships usually have fewer requirements.
- Get a tax ID or an Employee Identification Number (EIN). An EIN is like a social security number for your business. You need it to open a business bank account and manage taxes.
- Check for licenses and permits. Some businesses need special licenses to operate legally, like health department permits or reseller’s licenses.
- Open a business bank account. Setting up a separate account helps organize your finances. I’d avoid mixing personal and business expenses to make tracking much simpler.
If you’re outside the U.S., double-check your local legal requirements to register your online store. For example, in Canada, you need a business number and GST/HST account to sell goods or services online.
5. Build your online store
From choosing the ecommerce platform to setting up checkout, this step takes you closer to launching your online store.
1. Pick an ecommerce platform
Choosing the right platform makes setting up easy and ensures your store can grow with you. For a quick and easy setup, I recommend Hostinger ecommerce website builder.
It’s beginner-friendly and packed with features to run an online store, such as:
- Comprehensive store manager. From checkout to inventory tracking, you can manage your online store in one dashboard.
- AI-powered tools. Ranging from AI Image Generator to Heatmaps, these tools help elevate your online store.
- 0% transaction fees. Unlike many other platforms, Hostinger lets you keep all your profits.
- Multiple payment gateways. Offer secure payment options like PayPal, Stripe, and more to suit your customers’ preferences.
- Multilingual capabilities. If you’re planning to reach a global audience, you can easily add multiple languages to your online store.
- Google Ads app. You can promote your store with Performance Max campaigns right there from your dashboard.
In addition to the ecommerce features, the website builder comes with security and performance measures to ensure your online store runs smoothly. Starting at $3.99/month, it’s perfect for your first online store.
2. Create your online store
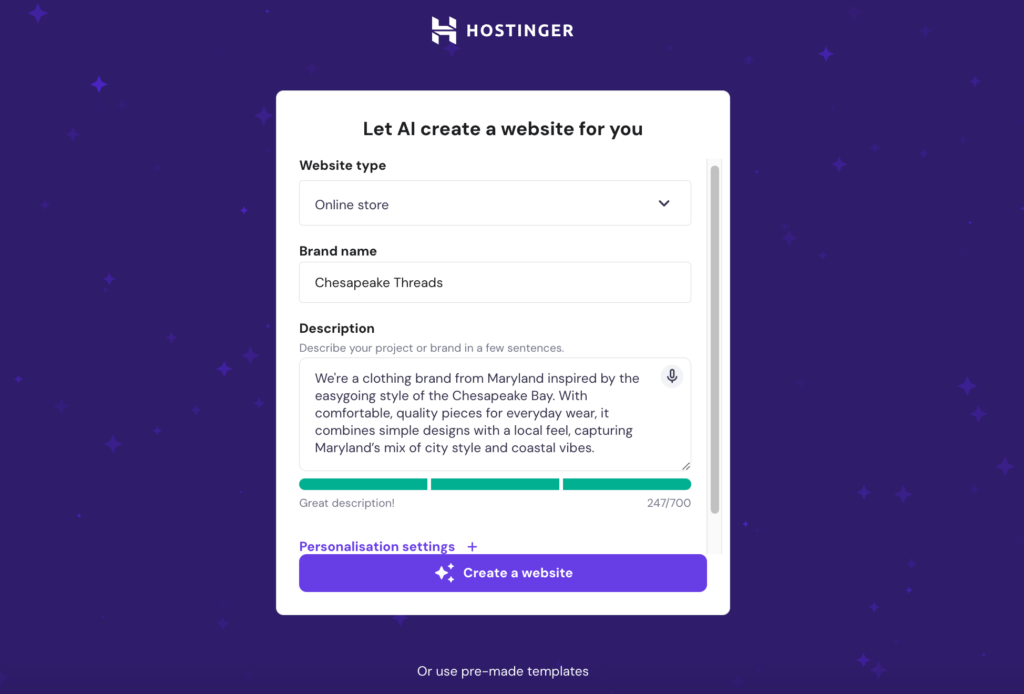
After purchasing the ecommerce website builder plan, it’s time to create the website. I recommend using AI as it makes the process a lot quicker. Here’s how I’d do it:
- Add your website type, business name, and description. Be detailed here and mention your products, location, and brand values to get a more accurate design.
- Customize the look by specifying your colors and fonts. For example, I might say, “I want earthy tones and a clean font like Montserrat.”
- Click Create a website and let the AI do its magic. In seconds, you’ll have a ready-to-use design.
The next step will take you to the online store’s preview mode.
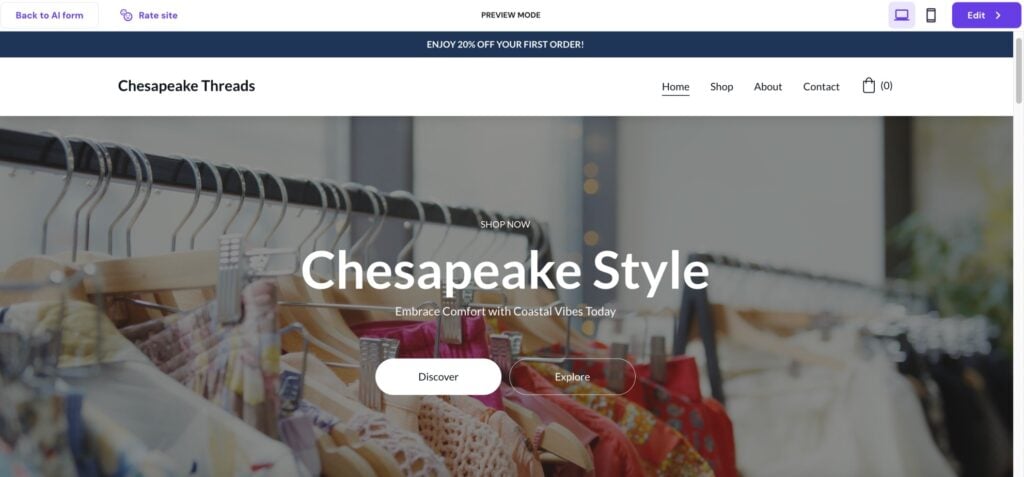
In this preview mode, you can browse the website pages. If you prefer another design, click Back to AI form at the top left. If you’re happy with how it looks, click Edit at the top right to proceed to the next step – which is setting up the online store.
Start by adding your store’s country and currency, then click Next. The setup process will take you to the Store manager.
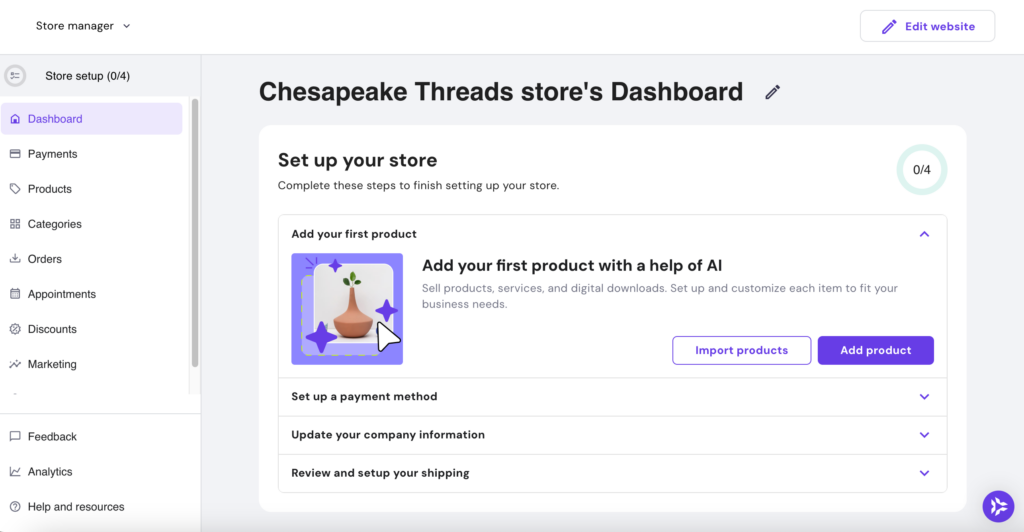
We’ll finish the online store setup in the next four steps.
3. Add products
The first step of the store setup process is adding your products – either by importing or uploading them. Go to Add product and choose your product type. If you sell physical products, you can upload multiple products at once.
Once uploaded, you can see all your products under the Products page.
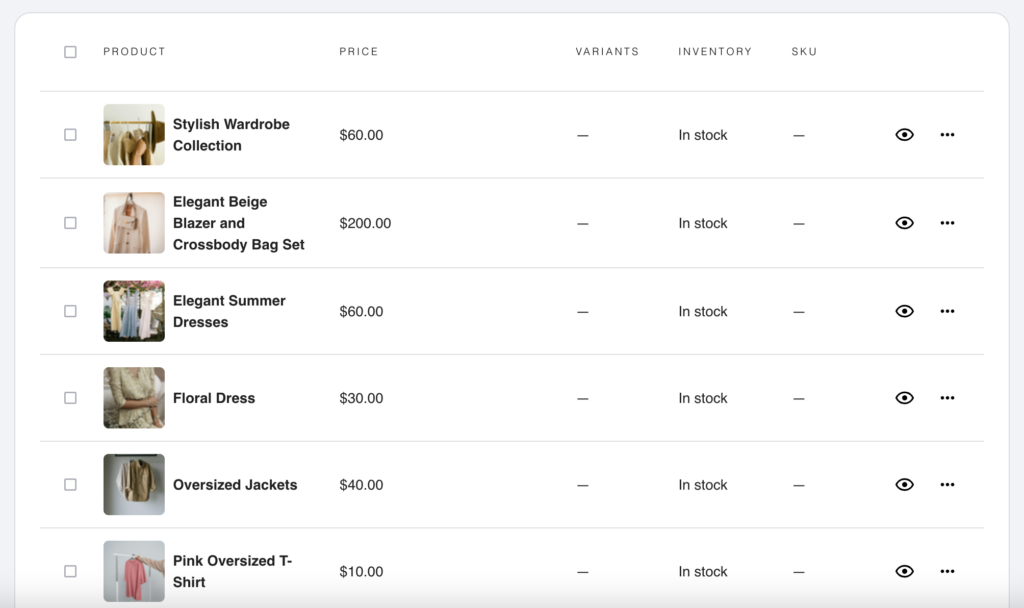
Next, you can start editing each product and add the product description, pricing, category, and other relevant information. Our guide on adding products can help you with the process and ensure you complete every step.
When editing product details, keep these in mind:
- Product category. You can start with simple categories like “New arrivals” or “Essentials”, which will help customers find specific items. As you add more products, you can create other categories for better organization.
- Product SEO. Add meta title, description, and keywords to help optimize your product page for the search engines.
4. Set up payment gateways
Offering multiple payment options is a top ecommerce trend because it makes shopping easier and improves the overall user experience.
Hostinger Website Builder offers various payment options, such as Stripe, PayPal, and credit and debit cards. Some regions also have their preferred payment method, for instance, dLocal Go is a perfect option if you’re targeting the Latin American market.
To connect with the payment gateways, go to Store manager → Payments.
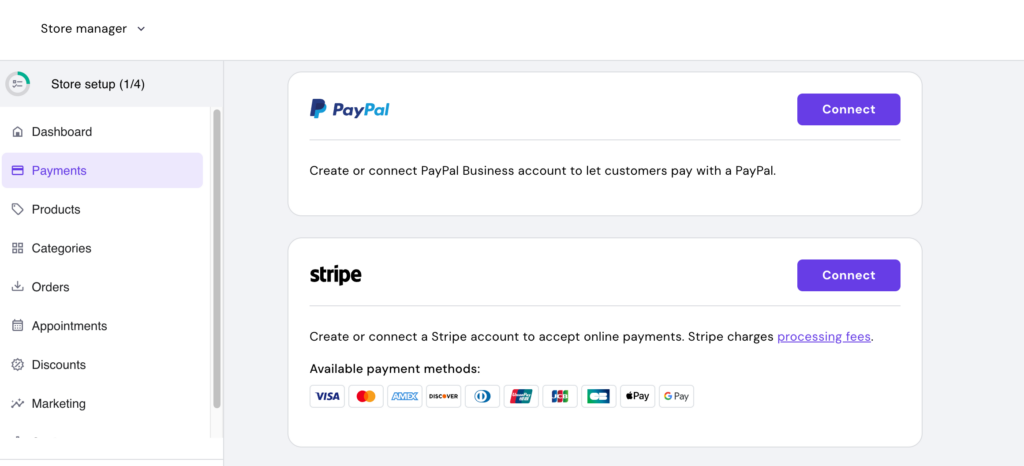
I recommend connecting as many payment gateways as possible. This gives customers more options and increases the chances of a successful transaction.
5. Update company information
The next step is to add company information to your invoices. This helps strengthen your branding and adds a professional touch to your online store. To do this, go to Store manager → Settings → Company information.
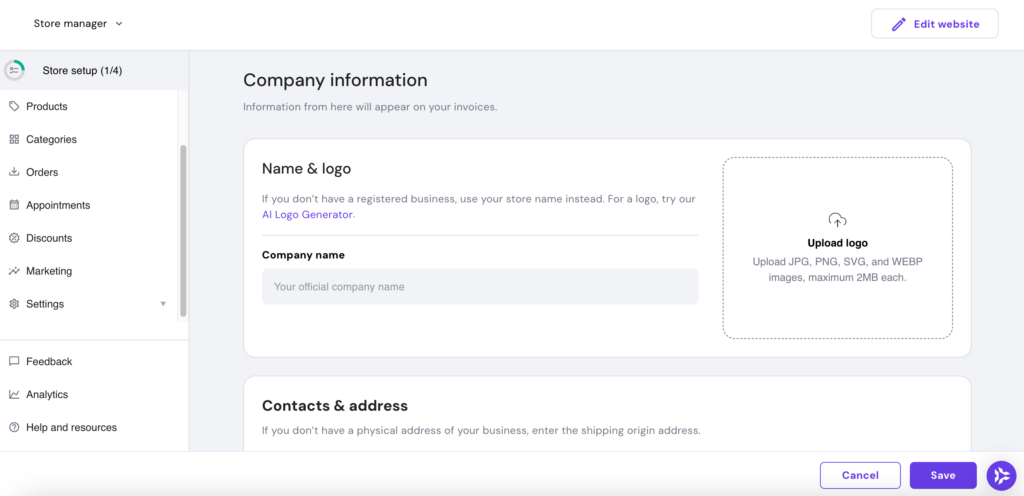
Add the business name and logo. Next, add your contact details and address. If you don’t have a physical business address, replace the address with the shipping origin address.
Once you have a purchase order, you can check and manage your invoices. Alternatively, you can create a test order to see how the invoices look.
6. Set up shipping and checkout
Let’s start by adjusting the shipping settings on your website. On the Store manager homepage, go to Settings → Shipping. Click Create zone and set up the shipping details.
Name the shipping zone and add related countries. For example, I set up North America and added the U.S., Canada, and Greenland. Once done, click Save and continue to customize the shipping options:
- Create and name the shipping options, e.g., regular and express.
- Add shipping rate.
- Add shipping condition type, which you can customize based on product price or weight.

Next, find reliable shipping agents that deliver to your chosen locations and add their shipping rates. You can start small by choosing your regular shipping agents, then consider a long-term shipping partnership once your business grows.
For checkout, the process starts with adding links to your store’s terms and conditions and privacy policy. To do this, go to Store manager → Settings → Checkout.
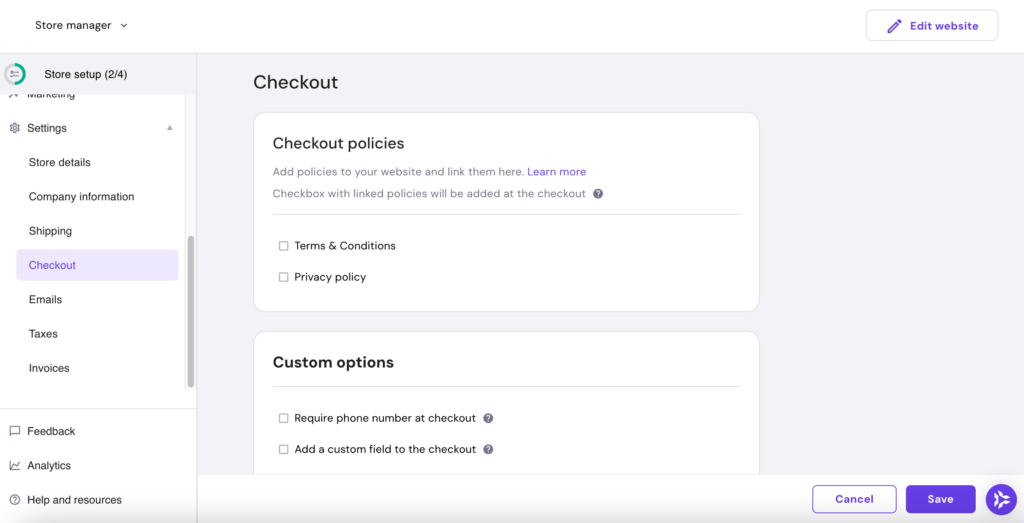
Tick the boxes for checkout policies, which include adding legal pages like Terms and conditions and Privacy policy. Once you’ve added all checkout details, click Save.
These six steps help you build your online store. Make sure that you cover all of them and, if needed, use our article on creating an online store to guide the process.
7. Launch your online store
Launching your online store brings all your hard work together. First, go over all the pages in the Store manager and check the features.
Next, click Edit website at the top right to go to the site editor page. Here, you can preview the website and connect the domain name before launching the online store.
Once you’re done, click Go live to publish the online store.
6. Start marketing your online store
Now that your store is set up, it’s time to promote it! Marketing helps you reach potential customers and keep them returning.
Start by creating social media profiles. About 82% of consumers use social media for product discovery and research, which can help increase awareness of your online store.
TikTok is becoming more popular, with 54% of business owners promoting their brands there. I asked Charlotte Ang of TrafficBees why TikTok can be one of your most effective marketing channels and what you should consider when creating content for the platform.
Another strategy I love is offering a launch discount. Discounts create excitement and give customers a reason to shop immediately. With Hostinger’s ecommerce website builder, you can set discount codes on the Store manager page.
Don’t be afraid to try different strategies and learn what works best for your audience.
7. Optimize for growth and performance
Continuous improvement is key to keeping your business competitive and your customers happy. Optimizing your store ensures it performs well, adapts to customer needs, and stays fresh over time.
First, collect customer feedback. Listen to what customers say about their experience and adjust based on their suggestions. I learned from Ben Read of Mercha how feedback can help increase customer satisfaction.
Second, analyze website analytics. Connect Google Analytics to your website and start measuring important metrics. This includes page views, click-through rates (CTR), and conversion rates to see which areas of your website are performing well and which need improvement.
Third, regularly update your website and product section to reflect the latest trends and customer preferences. For example:
- Add new products or seasonal items to keep your inventory interesting.
- Refresh product photos with high-quality visuals that resonate with your target audience.
- Update your website banners or homepage to reflect promotions or trending items.
By tweaking things based on feedback and keeping up with trends, you’ll keep your customers interested and set yourself up for steady growth over time.
Pro tip
When you make changes, always remember to update the website so you can view your latest changes live.
Conclusion
Starting an online store isn’t overwhelming when you take it one step at a time. To recap, there are three stages of starting an online store:
- Pre-launch. Choosing what to sell, identifying your audience, building a strong brand, and registering your business.
- Launch. Creating your online store, adding your products, and ensuring everything is ready to go live smoothly.
- Post-launch. Marketing your store to attract customers and continuously improving based on feedback and trends.
Every step brings you closer to creating a successful online store. Start your journey today!


tkmiixokzriegtpvyxdhrfifdojjot